Replacement Hip

These past two week have been the start of my stricter working schedule, and it has been working well so far.  I gave myself the task of making a more final version of the hip joint, working on a single piece each day.  This joint was designed and redesigned several times, and I could never find a version that really satisfied me.  As I’ve said before in this blog, hips are possibly the single most difficult joint to get right.  Initially, I may have had a joint that looked great standing and moving forward and back, but moving sideways was incredibly awkward.  It took a lot of trial and error to find a solution that looked right from every angle and bend.

HipDesign

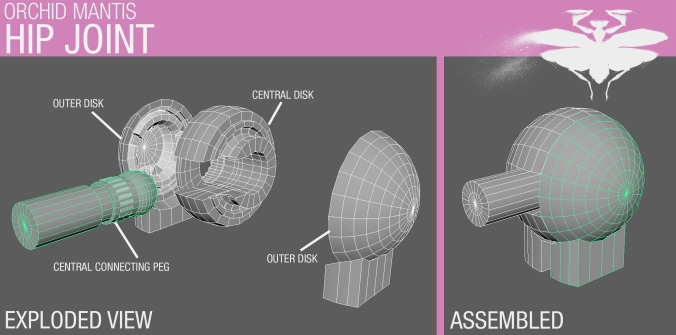
The solution I’ve arrived at is a spherical joint making up the hip/top of the butt, with the surrounding leg rotating revolving around the sphere.  The hip area has a ring the sphere sits in that rotates freely in the socket, covering any gaps that might otherwise appear from the joint.  The joint itself has gone through so many design changes I’ve lost count at this point.  I had been using a more common sphere joint, but since they would be sitting so close together within the hip section, there was no room to securely attach any pins coming out from the joint, or I would have had to point the pins upward, which would make moving and posing an awkward task.HipDesign2  Instead, I opted to find a way to put a pin from the pelvis into the joint.  It took a fair amount of engineering, since the joint has to rotate around this pin on two axis without getting in the way.  What I’ve arrived at is a central disk that sits snugly on the pin and rotates on one axis, and then two outer sections that make up the rest of the sphere rotating on the other axis around this disk.  This design seems a little overly-complicated to me, but as far as I can see, it was the only way to get the look I wanted with any degree of structural integrity.

I’m currently fixing the knee to a print-ready form.  As soon as that’s done, I’ll be prototyping a full leg, from hips to ankles.


Updated Concept

OrchidMantisSketches

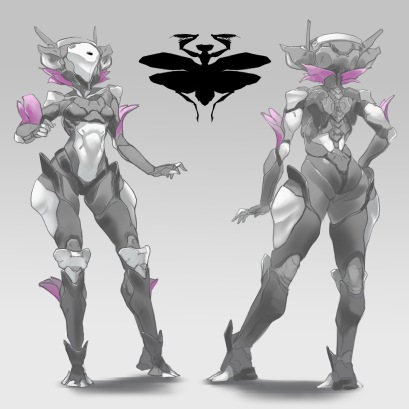
I have some new concept art to follow for this piece.  The longer this project goes on, the more outdated the original pieces feel.  The design is largely the same, with some changes primarily to the legs and helmet.  The original had these large plates on the front of the thighs that were getting in the way of the rest of the leg with articulation and holster functions.  At first I liked the way they looked from the side, but the more I stared at them, the more they felt like a weak point in the design.

The same sentiments apply to the helmet.  I still liked the original design, but the shapes just needed to be pushed a little more, mostly around the eyes.  When building this in 3D, the shape of the eyes wasn’t making a lot of sense.  Once again, the more I redraw the helmet, the more the design gets pushed towards something I’m really liking.

Finally, the first design also had these coattail elements around the back.  I lost them in the drawing for the sake of seeing the rest of the design better.  I’m on the fence about putting them again.  I like the design both ways.  I’ll probably give it a few weeks and see how I feel about it.


Summary

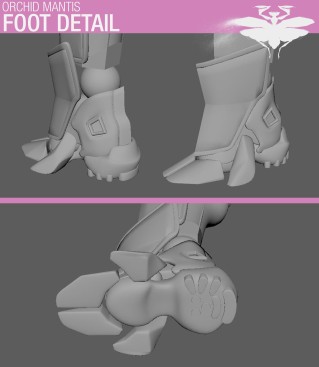
With the hip complete and a few updates to the earlier geared knee design, the leg is nearing completion.  I’m still testing a few designs for the knee pad.  My initial idea was to have a two-piece knee pad that slides when the knee bends.  That is still very much a possibility, I’m just trying to find a way to do it with the fewest moving parts.

In the next week or so I plan to start prototyping the leg and hip area.  As I move on to the rest of the body and finish designing the structures there, I’ll prototype those parts to fit with current prototypes, eventually building out a full prototype body.  Something like this really helps to see not only what the final product will look like, but also how all the articulation works together and the range of poses it will be capable of.  Seeing it on the computer is great, but a physical product is always better for me.

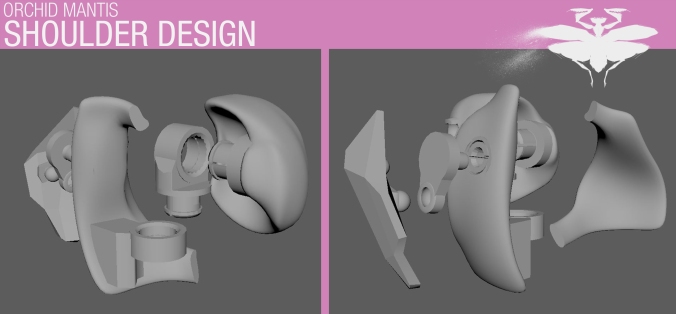
For my tasks in the next week or two, I’ll be putting the finishing touches on the knee and moving onto a prototype ready design for the shoulder/upper torso area.  The current version works well already, so the main design challenges are to make it more compact and clean it up a little.  Once that’s finished and printed, I will have a mostly complete prototype body.

-Nick

Back from Hiatus

I’m finally coming back to this project after what turned out to be an extended hiatus.  I ended up stepping away after burning out for a bit, and tried a few other projects.  Luckily, some of those projects were other quick figures which provided some better direction for this figure.

BladeDesignMost recently, I spent some time prototyping the arm blade.  This is probably the single most redesigned piece of the entire figure.  I posted some concept art a while back thinking I had a design I liked, but just days after it went up, I had my doubts about it.  I went all the way back to the idea stage.  I realized I was being way too safe with my design, and was worried anything really cool would be difficult to make.  But, if it’s worth doing, might as well do it right or not at all.  What I do have still isn’t finished, but it’s heading in the right direction.  I’m picturing something where the whole forearm spreads out into this big, intimidating blade display.  It’s difficult to get everything packed into such a small form, but I’m getting there.  I know how most of it needs to work.  Really the issue now is trying to reduce the number of moving parts and create the most efficient mechanism I can.


Design Updates

The rest of the design has been changing slightly.  Every time I draw Orchid Mantis in my sketchbook, I tweak the suit in one direction or another.  And I like it a little more each time.  There haven’t been any major changes or anything, but I’d say enough to warrant some new concept art to follow.  Most of it is better shape designs on the armor pieces.

MantisSketch

Recent sketch with newer (better?) shapes and armor pieces.


Some Reflection

After burning out on this project for so long, I felt the need to examine why it took me so long to pick it back up again.  I think for entirely too long, I’ve been relying on motivation alone to get me through this project.  I had been lucky enough to be motivated about finishing this for months, which is a rare feat for me.  I typically burn out on a project after a week or two and want to move on to something else, so I thought I had this one locked down.  It may have taken longer than normal, but the burnout was inevitable.  I wanted to try a few other things to get the creative juices flowing again, and so I did, and naturally got wrapped up in those things.

I think the issue is that the majority of the creative work on this project is done.  Now comes the tedious part where I just have to sit down and make it.  That can burn someone like me out fast, especially when you try to force yourself to spend a whole day doing as much as you can.  So I’m trying a new schedule.  Two hours a day, then do something else creative.  Every day.  Each day I open the file, I give myself one task, rather than trying to do a little bit of everything and end up doing nothing.  This week I’m finishing the hip joint, one piece at a time.  Next week, probably the rest of the leg.  Slow and steady.  Motivation started this project, but discipline is what will finish it.

-Nick


Building a Better Shoulder

Much like the knee design a while back, I wanted to improve on many of the standard designs for shoulder joints seen in action figures on the shelves.  To start, I decided I wanted to incorporate a rolling shoulder design in addition to the normal shoulder joint that you see on every figure.  This isn’t that unusual, and if you haven’t seen it, a rolling shoulder makes a world of difference to the realistic pose-ability of your figure.  Without it, you end up with very stiff ‘action-figurey’ poses instead of the more human poses seen in higher-end figures.

ShoulderJointEx

There are already plenty of good examples of rolling shoulder designs on the market.  Many of them use a ball joint deep in the chest which the outer joint is attached to.  This is fine for smaller 1/12 scale figures, but I was concerned about a ball joint reliably holding a pose on a figure this size.  I also wanted to avoid the ball joint since it would allow the shoulder to move on 3 axis, and I wanted to limit it to 2 (being able to move forward-backward and up-down without rotating).  To solve this, I put two single-axis joints together inside the chest cavity.  This gives the joint all the movement I wanted it to have.  I also put a ratcheting ring in each of the joints to help hold poses.

ShoulderDesign

The shoulder blade went through several different iterations before I had something I thought would work.  At first I thought of putting in sliding joints on ball joints, all this complicated stuff that would be really unreliable, prone to breaking and would most likely get stuck too frequently to work.  Instead, I put the whole scapula on a small rotating piece on the back.  The scapula is attached with ball joints on the shoulder and rotating piece to give it freedom of movement.

ShoulderPrint

While this prototype isn’t perfect, it turned out far better than I expected for a first attempt.  Everything works as intended, and it actually looks really cool when it moves.  Something about adding that shoulder blade in gives the movement a very natural, organic feel.  There are still changes to be made before moving onto the final version, but this will do for now.  This piece was probably the most experimental part of the figure, and the one I was most concerned about getting to work.  But holding a working version in my had is deeply satisfying.  I’m feeling a little more confident about everything else.

-Nick

Fancy Footwork

The main body has been blocked in, so I’m now working my way back up with some additional detail.  Starting at the feet, I made my way up the knees with some more concrete design work.  I’ve also been fleshing out a lot of the specifics of construction.

Foot_Detail.jpg

The feet have taken some work.  I had a general idea of what they were supposed to look like, but they were admittedly not my biggest focus when creating the concept.  I’m probably going to be doing a few follow-up concept pieces throughout the build to get a better sense of the details.  For right now, though, I like the idea of bringing in some elements of trail shoes to this robotic foot design.  It also made me start thinking about different materials I could use when casting the final pieces.  I want to look at what’s available, but doing the soles of the feet and other parts out of a flexible rubber would really give the final piece some extra flair.

—————————————–

I’m trying something new with the knee design to solve a problem that most likely no one else is really  bothered by.  I’ve always found it a bit awkward how so many figures on the market use a traditional double-knee joint.  Many Play Arts Kai figures, for example, use a ridiculously over-sized joint, which makes for weird poses when bending the knee.

Knee_Example.jpg

I’ve also had the experience that when you bend the leg, usually one joint will bend all the way before the other starts bending.  So, in an attempt to fix that noise, I’m adding geared teeth onto the joints to ensure the leg bends evenly every time.  It’s most likely over-engineering for such a minor issue, but this is my project, dammit, and it will be meet my expectations.

Knee_Detail.jpgI had gone through a few different versions of implementing this idea.  The last had exposed teeth on the joint, and although it was simpler, I hated the idea of being able to see the inner workings of a detail that should be invisible.  Currently, it’s fairly similar to many of the double joints other figures use, just hollowed out to make room for the teeth on the inside.  I will most likely be prototyping this piece next.  I plan on trying a few different gear ratios.  Right now it’s set up for two gears of the same size, but I think one large and one small gear may actually give a more realistic result.  Looking at the way a knee bends, the kneecap appears to stay in line much more with the shin than the thigh.  To achieve this effect, I think I’ll need a small gear for the top joint and a larger one for the bottom.  More to come as this develops.

-Nick

Form and Function

Body2

Legs blocked in

Pressing ahead with the modeling process.  I spent some time this week getting most of the body blocked in.  Instead of trying to focus on one piece at a time to completion, I’m finding it easier to block in everything first, then come back and polish everything up piece by piece.  The block in process has gone surprisingly fast, but I’m sure I’ll get caught up with adding in all the little details and spending more time there than anticipated.

This is also the point where I’m trying to tighten up a lot of the articulating parts.  I’ve modeled the pieces to look correct (roughly) at this point, but haven’t tested the angles of articulation yet.  Playing around and rotating things in Maya is the quickest and easiest way to test a lot of these things before going to print.  The hip joints, for example, had only been roughly placed in.  I placed a sphere where they would go to find the center point of rotation, and moved the joint there.  Then I was able to move the hip piece and reshape it so it would still look right no matter how it is posed.

I’m finding hips are a little more difficult to get right compared to the rest of the body, because you’re trying to mimic a very fleshy part of the body (i.e., the butt) with hard plastic.  Most figures I’ve seen handle it in a few ways: either the classic G.I. Joe T-crotch  (terrible), a plate-like design for the butt to cover the joint from behind (awkward in most poses), or make the ball joint that combines most of the mass with the rest of the leg (best option).  I’ll be going with option number three.HipJointEx

——————————-

Another piece that’s been taking a while to figure out is the back and shoulder area.  Many of the figures I like incorporate a rolling shoulder for better articulation, and when posing, makes a huge difference between more natural poses and that infamous stiff action figure pose.  However, I want to try something new (at least I’ve never seen it before, that is).  I want to add in a shoulder blade on the back, connecting the inner shoulder joint to the outer body.  If done right, I think that piece could add some cool detail, and have one more moving part to make poses even more realistic.

Shoulder

This is taking a little bit of planning to get right, because it’s essentially a floating piece with two connection points, and needs to be able to handle a weird range of motion.  The piece attached to the shoulder needs to be a ball joint, while the part attached to the back should be a ball joint that can slide, hinge and rotate.

Again, I’m still in the blocking phase, but it’s never too early to start thinking about this stuff.  The sooner I get it figured out, the easier everything else will be in the future.

-Nick

Begin Sculpting Phase

Base_Mesh

I spent a little time in ZBrush this weekend to get a simple base mesh fleshed out.  From here, I’ll be importing the base into Maya to work on bit by bit.  This base is really only to serve as a guide, since the final version will be made of several little pieces.  Not concerned about the details (like fingers or muscles), I just want to get the basic proportions down to have something to work with.

In the past, I would’ve probably done an isometric drawing to work from directly in Maya, but I’ve found that takes a lot more time and probably isn’t quite as accurate.  This way feels much quicker and intuitive.  While I have had some experience working in ZBrush, I’m far more familiar with Maya.  I haven’t had much opportunity to use the two together on a single project, but I’m definitely seeing the benefit in being fluent with both.  The next step will be to get the first pass at a skeleton set up with all the joints in place.  From there I can build out to the bigger pieces.

-Nick